

Paneer Tikka is a popular and delicious tandoori snack where Paneer (Indian cottage cheese cubes) are marinated in a spiced yogurt-based marinade, arranged on skewers and grilled in the oven. Worry not if you don’t have an oven – instead of grilling in oven, you can make Paneer Tikka Recipe on stovetop on a tawa/skillet. In this post I am sharing both the oven and stovetop methods.
What is Paneer Tikka
Tikka basically means anything that is marinated and then baked or grilled or fried and paneer tikka is a popular vegetarian tikka dish. This tasty homemade version is similar to the dish served in restaurants, but I would say actually tastes better!
The Indian spice powders mixed with the yogurt (curd) make a flavorful marinade that is soaked up by the porous paneer cubes. Grilling the skewers then produces a nice slightly crispiness on the paneer.
You can easily use this recipe of paneer tikka to make the very popular curry based dish of Paneer Tikka Masala.
What is Tandoori Style Cooking
For newbies to Indian food, tandoori style cooking is when marinated ingredients or Indian flatbreads, in this case paneer cubes, have been threaded on a skewer and grilled in a tandoor, which is a cylindrical clay oven.
This produces a subtle charcoal flavor and is a popular way of cooking in Indian restaurants. In this homemade version we grill the paneer skewers in the oven, although you can even bake them.
Most of the times for tikka recipes, the yogurt-based marinade is made which is unique to the tandoori style grilling.
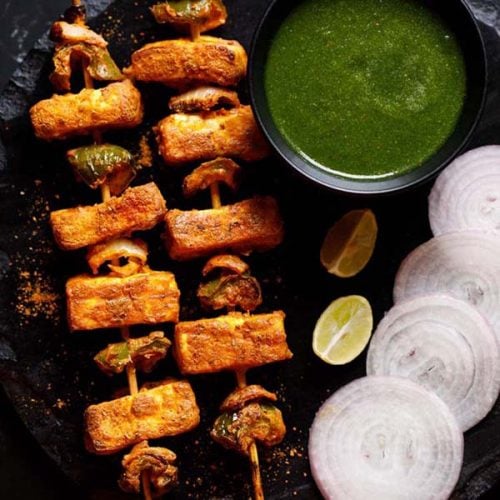
This restaurant style paneer tikka be easily made at home. In this delicious recipe, paneer cubes are marinated in a spiced yogurt-based marinade, arranged on skewers and grilled or baked in the oven.
This spicy snack is a dry dish, meaning it is not in a gravy sauce, but the paneer cubes themselves are juicy and succulent.
Bell peppers (capsicum) and onions have been added to the skewers in this recipe. The veggies add flavor and nutrition and you can add as many as you like. This vegetarian dish makes a great appetizer or side.
Ingredients You Need
- Paneer (Indian Cottage Cheese): This is the main ingredient in the dish and it is important to use a good quality paneer. In fact, as with all my paneer recipes, I recommend using Homemade Paneer. This ensures freshness and avoids any hidden ingredients and preservatives found in store-bought paneer.
- Marinade: Homeade Hung Curd (Hung Yogurt) is used as the base of the marinade. You can even use Greek Yogurt. The ground spices are then added to balance out the sour yogurt taste and give a flavor kick to the dish.
- Veggies: Here I have used bell peppers (capsicum) and onions. You can use veggies of your choice, including baby corn, mushrooms, cauliflower, tomatoes, broccoli and more.
Step-by-Step Guide
How to make Paneer Tikka – Restaurant Style
Prep Work
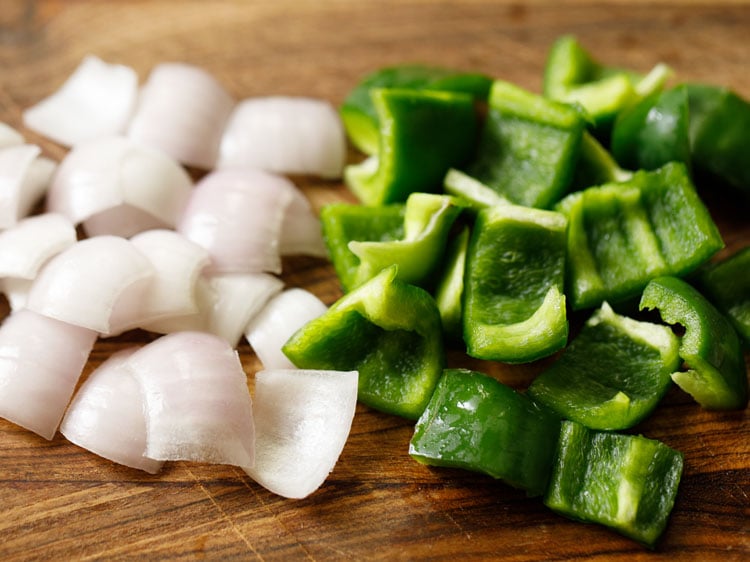
1. Peel, rinse and dice 1 medium-sized onion in square shaped 1 to 1.5 inches pieces. Rinse and slice 1 small to medium sized capsicum (green bell pepper) in 1 to 1.5 inches pieces.
You will need ½ cup each of onions and capsicum. Set these aside. You can also use tomatoes if you want.
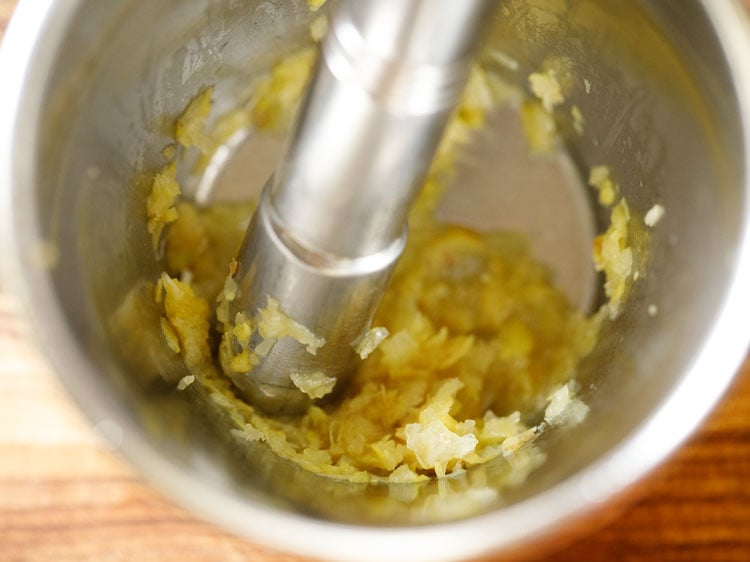
2. Crush 1.5 inches ginger and 6 to 7 small to medium sized garlic to a fine paste in a mortar-pestle.
You will need 1 tablespoon of crushed ginger-garlic or 1 tablespoon of ready ginger-garlic paste.
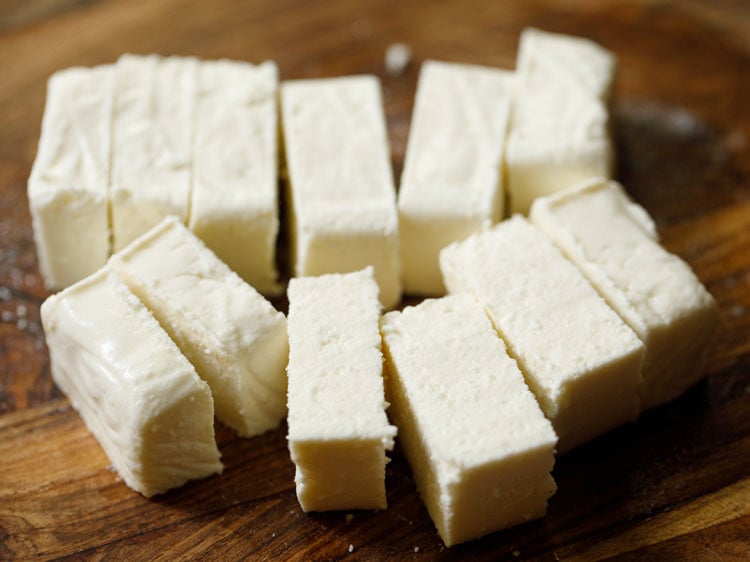
3. Slice 200 to 250 grams block or paneer into cubes or squares and keep aside. Best is to use homemade paneer.
Make Tikka Marinade
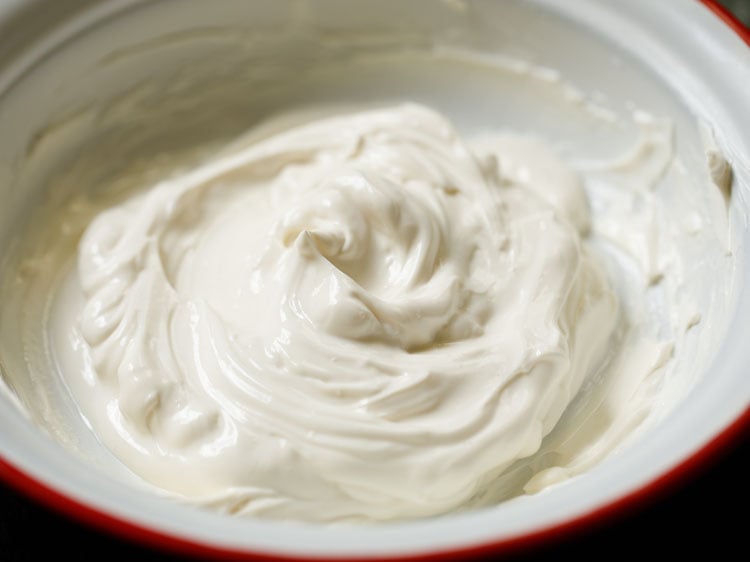
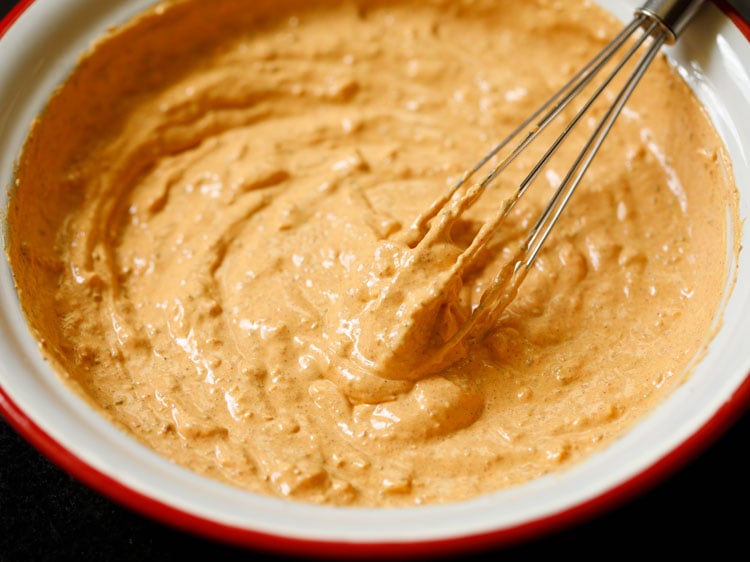
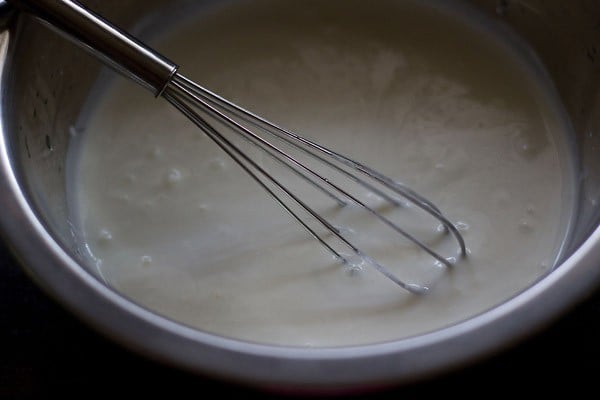
4. Put 200 grams hung curd (greek yogurt) in a bowl. With a whisk beat the curd lightly till smooth.
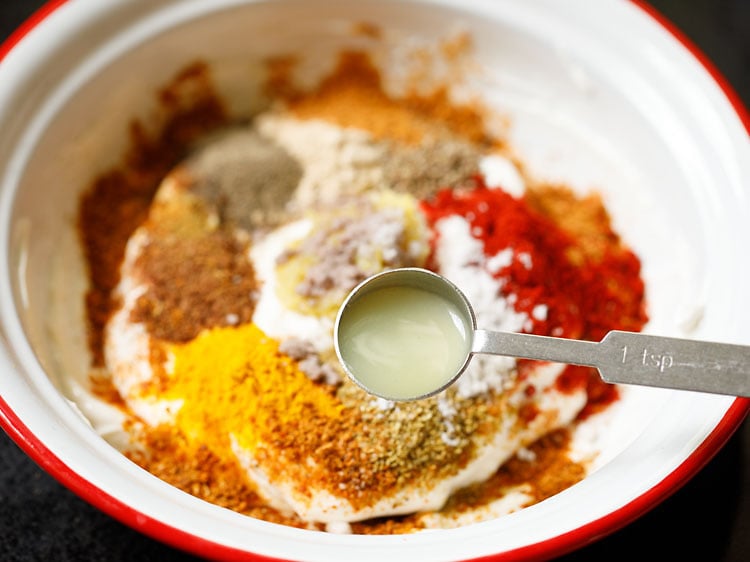
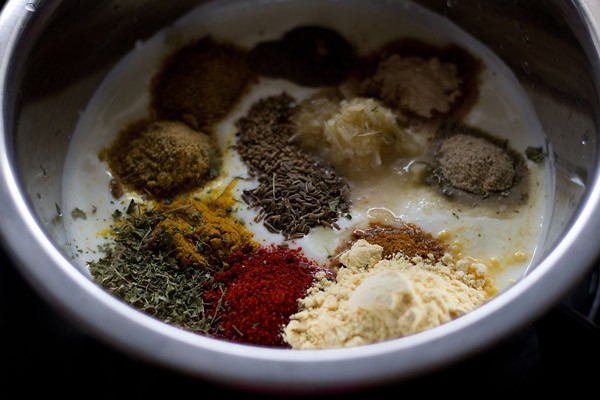
5. Now add 1 tablespoons ginger garlic paste or 1 tablespoon crushed ginger garlic to the curd. Also add all the dry spice powders. Below you see the following Indian spice powders in clockwise order:
- 2 teaspoons kashmiri red chili powder
- 1 teaspoon coriander powder
- ½ teaspoon turmeric powder
- ½ teaspoon garam masala powder
- 1 teaspoon cumin powder
- 1 teaspoon dry mango powder (amchur)
- 1 teaspoon ajwain (carom seeds)
- 1 teaspoon chaat masala
- ½ teaspoon black pepper powder (optional)
Kashmiri red chili powder gives a nice red color to the food but is not spicy and hot.
Instead of kashmiri red chilli powder, you can add 2 teaspoons of sweet paprika or ½ to 1 teaspoon of cayenne pepper.

6. Add ½ teaspoon black salt and regular salt as per taste. If you do not have black salt, then skip it.

7. Add ½ tablespoon (1.5 teaspoons) lemon juice.
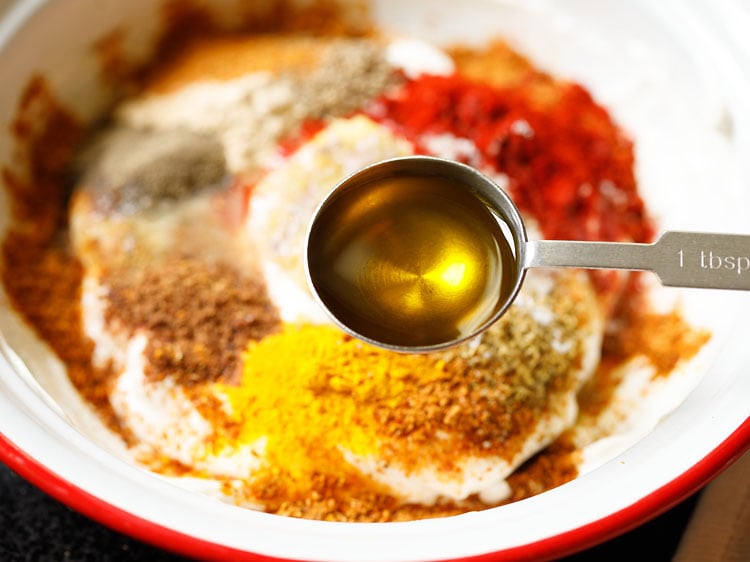
8. Next add 1 tablespoon mustard oil. If you do not have mustard oil, then use a neutral tasting oil.
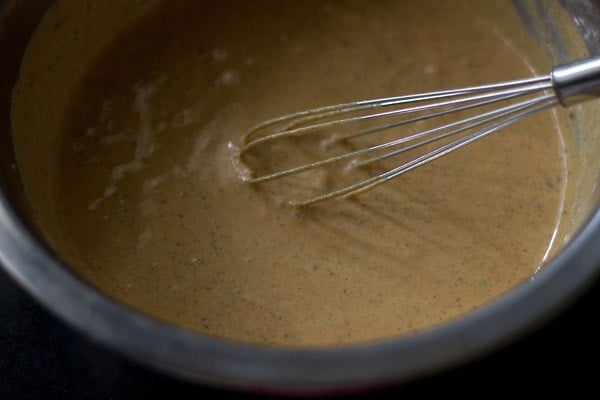
9. Mix very well. Check the taste and add more seasonings if required.
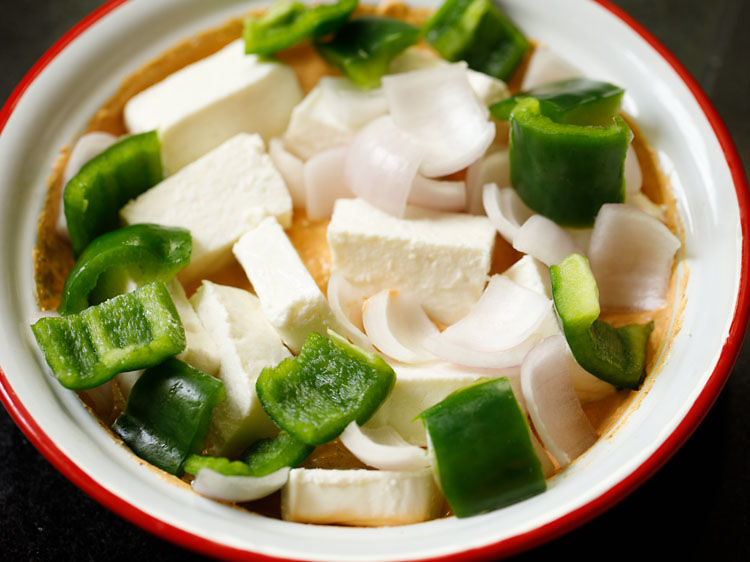
10. Add the onions, capsicum and paneer to the marinade.
11. Slowly and gently mix them with the marinade. Cover and keep the marinated paneer and veggies in the refrigerator for 2 hours or more.
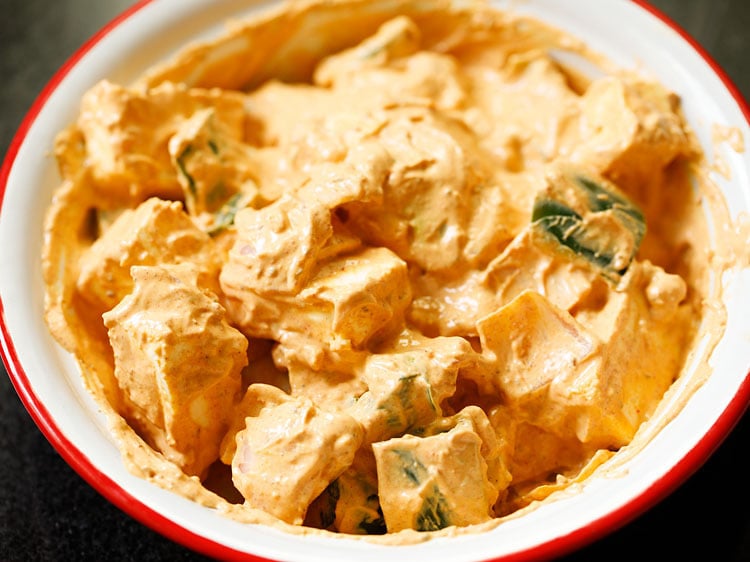
12. This is how they look after 2 hours.

Assemble and Grill Paneer Tikka
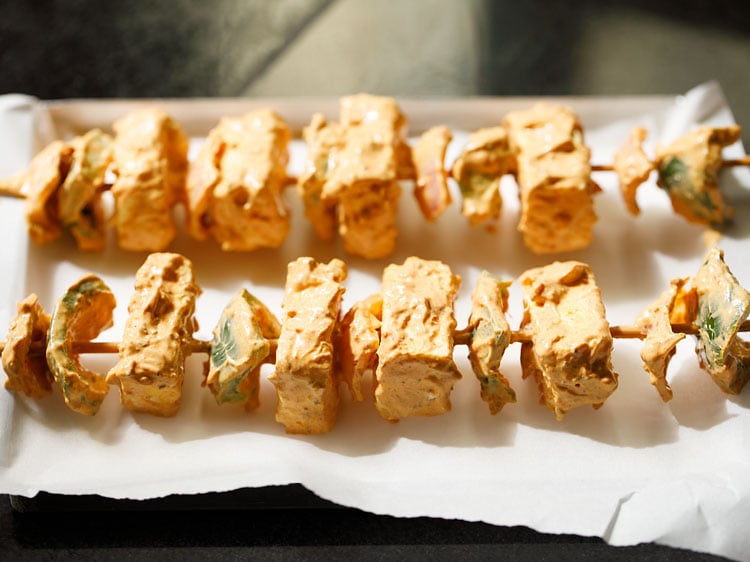
13. Begin to thread the veggies and paneer alternately on bamboo skewers. Before you begin to thread preheat oven at 230 or 240 degrees Celsius or 464 degree Fahrenheit for 15 to 20 minutes.
Use only the top heating element while preheating as well as grilling. Soak or rinse the bamboo skewers before threading.

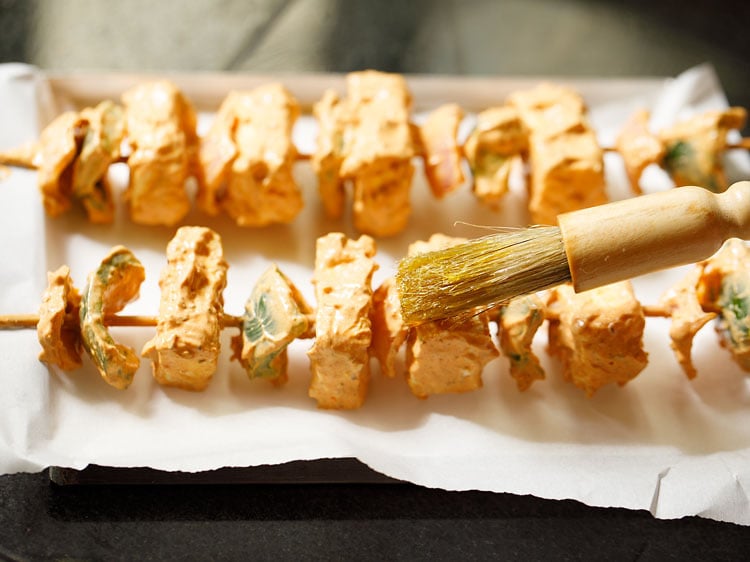
14. Place them on a tray lined with aluminium foil or parchment paper.
15. Brush with some oil all over.
16. Place the tray on the top rack and grill in the preheated oven for 7 to 10 minutes first at 230 to 240 degrees Celsius or 464 degrees Fahrenheit.
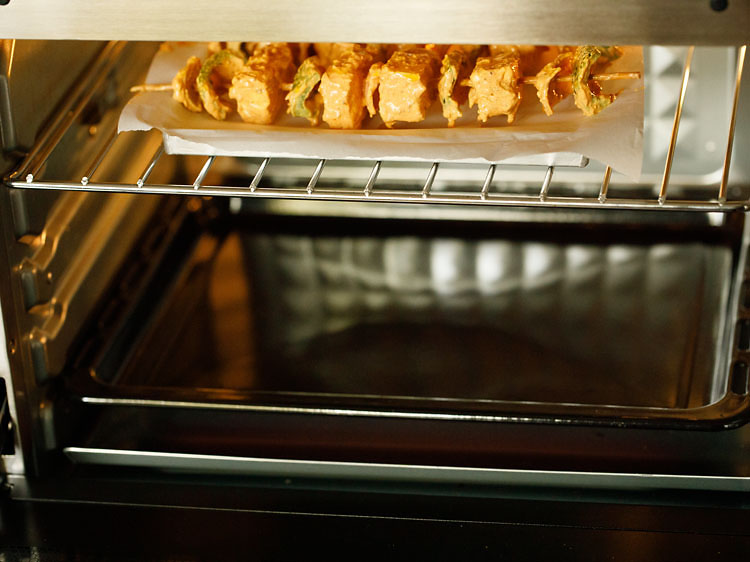
17. Then remove the tray from the oven and turn the paneer tikka skewers.
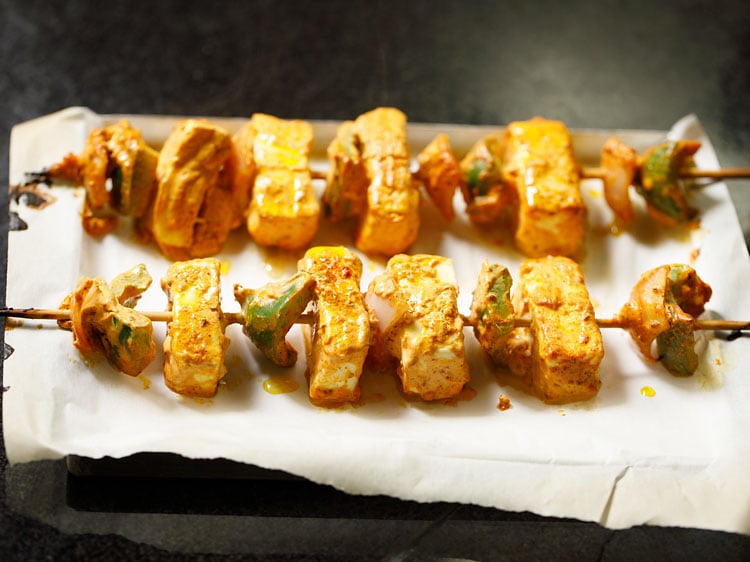
18. Again keep back on the top rack in the oven and continue to grill till the edges of paneer and veggies are golden or slightly charred for about 3 to 5 minutes.
Do not grill for a long time as then paneer becomes hard. Since temperatures vary from oven to oven do keep a check.
You can reduce or increase the time as required. Total grilling time will be 15 to 20 minutes.
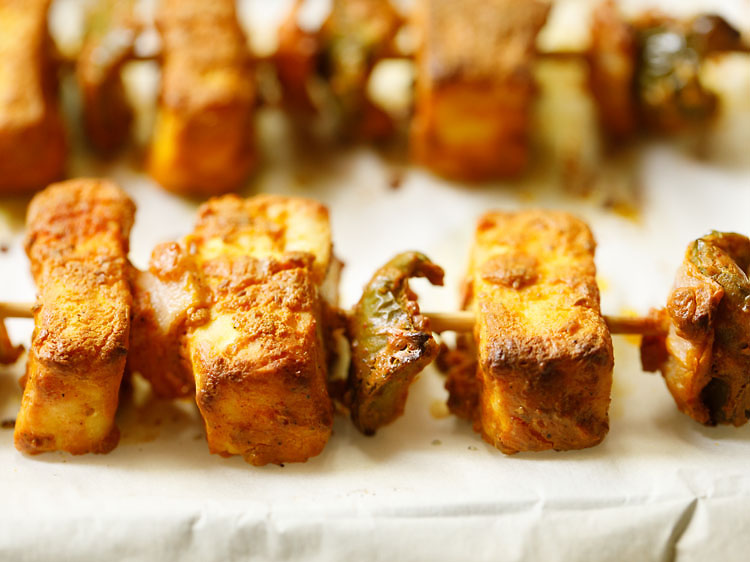
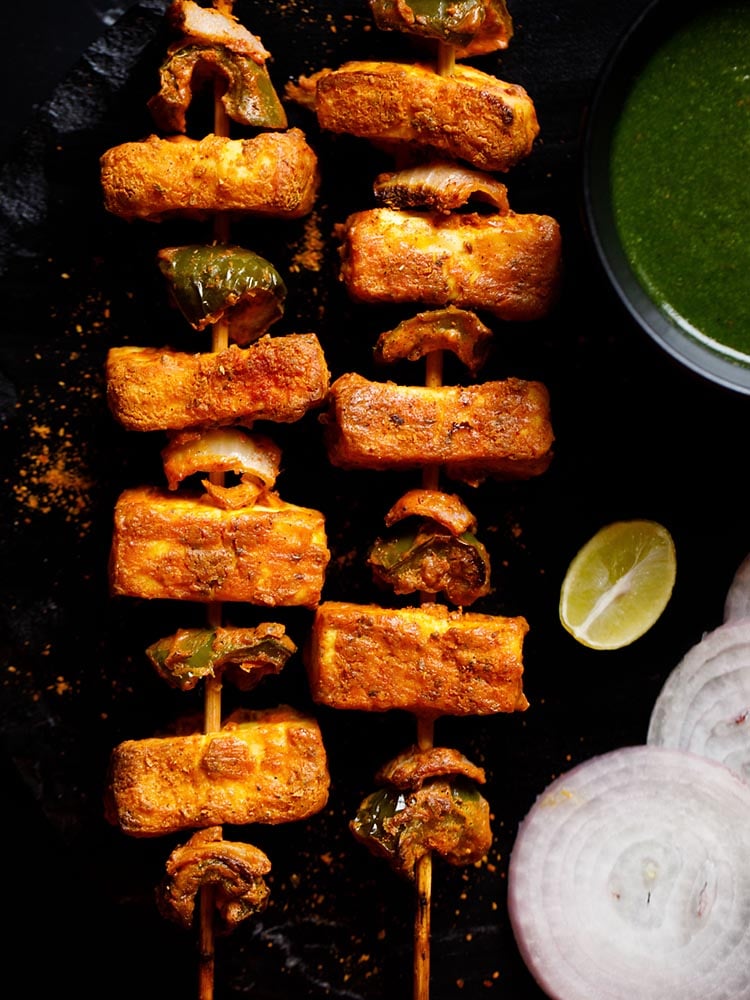
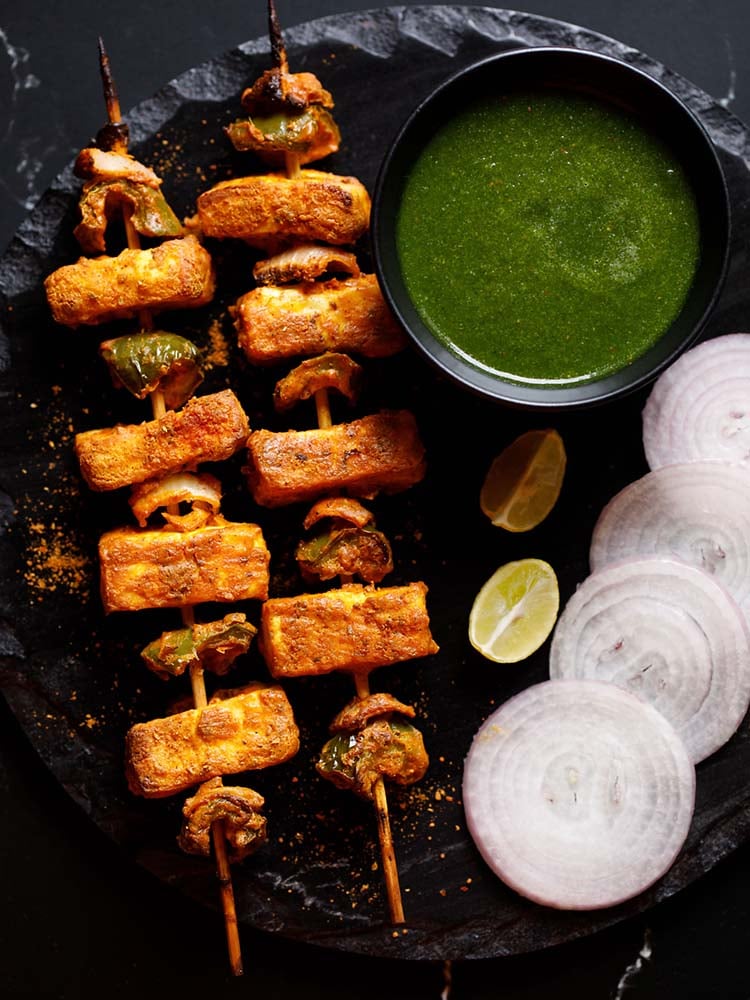
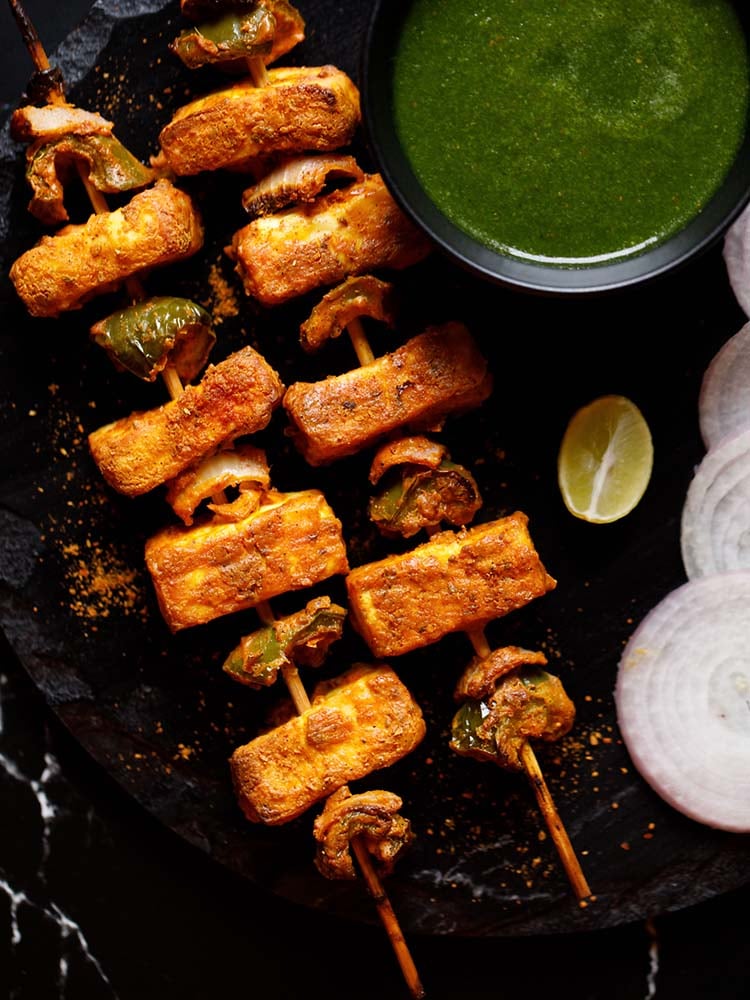
19. Remove once done. Serve the paneer tikka sprinkled with some chaat masala and lemon juice. Also serve mint chutney, onion slices and lemon wedges as sides.
Step-by-Step Guide
Paneer Tikka On Tawa
This is an easy and foolproof recipe of a delicious paneer tikka on tawa or stove top or griddle or skillet.
I had got many comments on how to make paneer tikka on tawa . So I decided to share this easy method. Since not everyone has an oven. If you don’t have a tava then you can also make this tikka recipe in a frying pan.
Many years back, I did not have a baking oven. We had a microwave oven, but its only function was to heat or cook food with the microwave rays.
Those days, I used to make paneer tikka on tava. When for the first time I made the tikkas, the paneer squares were sticking on the tawa and would get slightly burnt.
So here the tawa was at fault. I would use tawa which were used to make roti without any fat (ghee or oil) and so were not seasoned.
Later while frying them on non stick tawa, the paneer pieces would not get stuck. I also experimented with adding besan (gram flour) to the marinade and felt it gave a good crispness and taste to the tikka. The besan also would help in the paneer not getting stuck to the tawa.

Prepare The Tikka Base
1. First whisk 2.25 cups of thick curd or hung curd till smooth in a bowl or pan.
2. Add all the spices and herbs including besan (gram flour) & salt.
- 4 tablespoon besan (gram flour)
- ½ teaspoon turmeric powder (ground turmeric)
- ½ teaspoon black pepper powder
- ½ teaspoon carom seeds (ajwain)
- ½ teaspoon caraway seeds (shahjeera)
- ½ teaspoon crushed kasuri methi (dry fenugreek leaves)
- 1 teaspoon coriander powder (ground coriander)
- 1 teaspoon cumin powder (ground cumin)
- 1 teaspoon garam masala powder
- 1 teaspoon dry mango powder
- 2 teaspoon Kashmiri red chili powder
- ¾ tablespoon ginger garlic paste
- ¾ teaspoon regular salt or edible rock salt or add as required.
3. Stir and mix well.
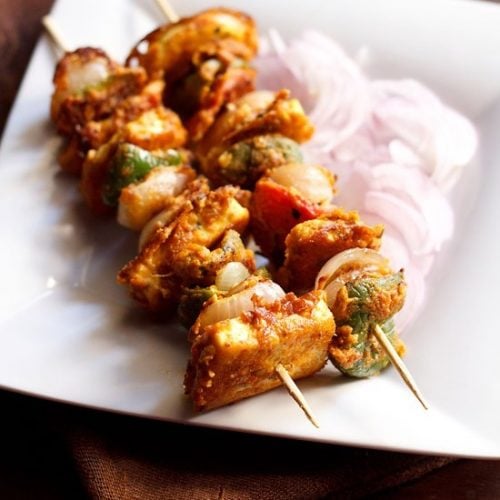
4. Add the diced vegetables – 1 medium to large bell pepper/capsicum, 1 medium to large tomato and 1 medium to large onion. Also add 250 to 300 grams paneer slices.
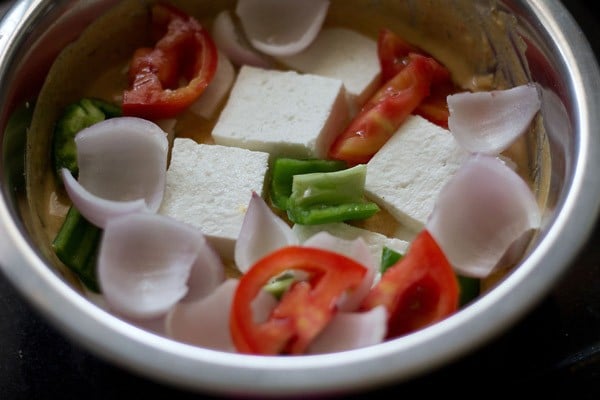
5. With your hands or spoon mix very well so that the marinade coats the paneer and veggies evenly.
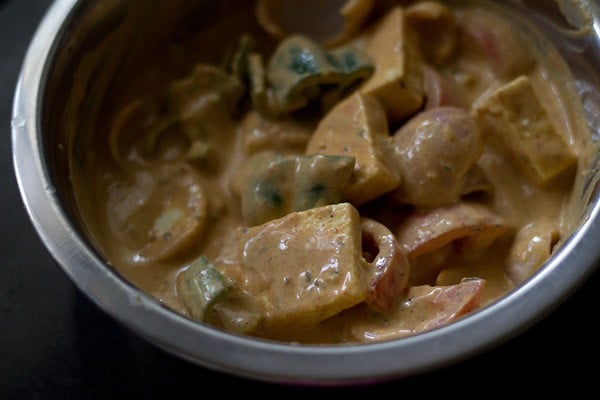
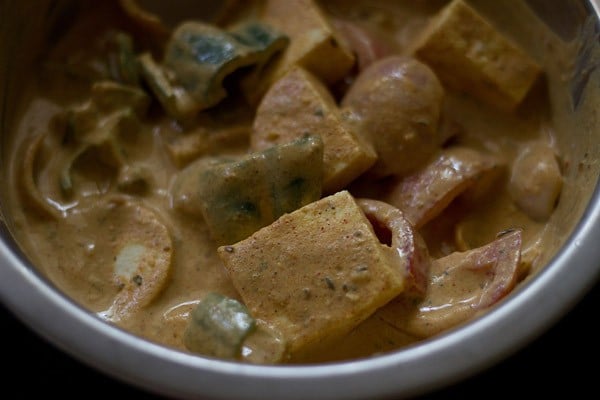
6. Cover the bowl and keep the marinade in the fridge for 45 minutes to 3 hours. You can also keep overnight. The below photo is of the marinated paneer and veggies after 1 hour.
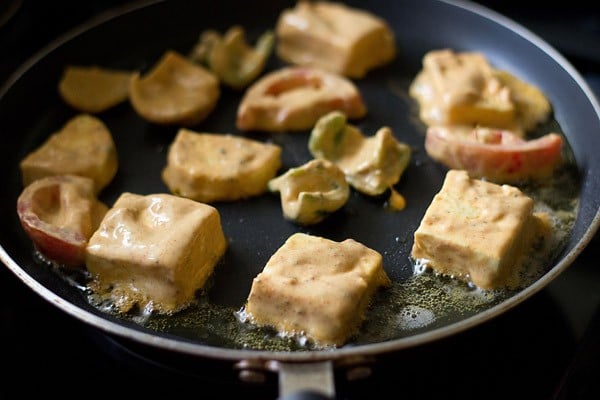
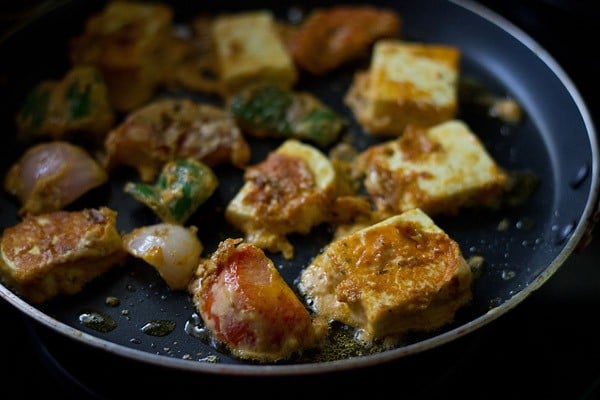
7. Heat 1 tbsp oil in a non stick pan/tawa or a well seasoned cast iron skillet. Coat the paneer and veggies with the marinade and place them on the tawa.
You can fry at a low heat or medium heat. I fried in 3 batches and overall used about 3 tbsp oil.
Another way is to skewer the paneer, veggies and then fry them. I chose to fry them directly as they get fried evenly and the texture is better.
8. When one side gets browned, gently lift and turn over. The paneer cubes will get cooked faster than the veggies.
So remember to remove the paneer cubes as soon as they are golden. You can char or brown the veggies more.
For the vegetables, you have to make sure the marinade on them gets cooked. So lightly press them while cooking.
If you want you can fry the paneer cubes first and then the marinated vegetables. Pan fry all till they become golden.
9. Remove paneer tikka on a plate. I have not removed them on paper tissues, as due to heat and moisture from the paneer cubes, they stick to the paper tissues.
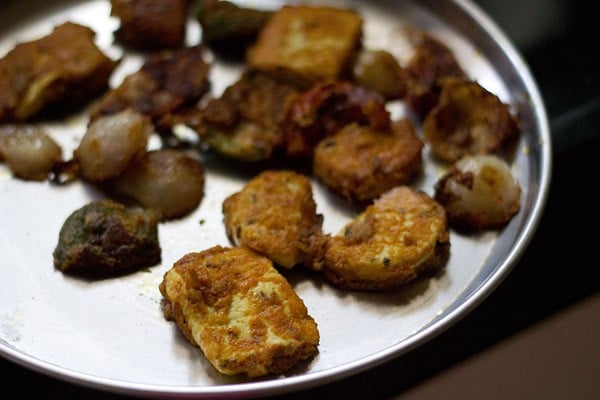
10. While still hot, then skewer the fried paneer cubes and veggies on to a wooden skewer or toothpick.
You can also have this paneer tikka straight away without skewering. Sprinkle 1 teaspoon chaat masala and ¾ teaspoon lemon juice on the paneer cubes while serving.
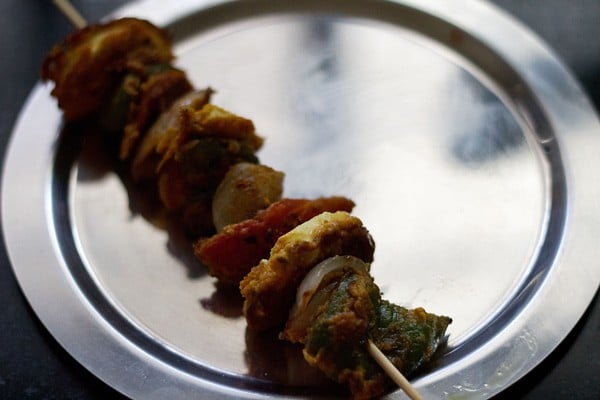
11. Arrange them in a serving plate and serve the paneer tikka hot or warm with onion lemon salad or mint chutney.

Serving Suggestions
Whether you have made paneer tikka in the oven or on the tawa, it is always served with this bright Mint Chutney that is made with curd (yogurt). This chutney is the traditional sauce or dip that is served with all tandoori dishes.
Onion slices and lemon wedges are also traditionally served with this appetizer dish or starter snack.
They even go well as a side dish. You can even eat paneer tikka with roti, naan or bread or make wraps or rolls with them filled with your favorite toppings and veggies.
Expert Tips
- Barbecue: You can also cook the paneer tikka on barbecue grill.
- Grilling in the oven: In the oven grill for 15 to 20 minutes at 230 or 240 degree celsius with only the top heating element on. Basically here we are broiling the dish.
- Marination Time: It is best to marinate the paneer cubes for 2 hours or more. You can also keep the marinated paneer overnight in the fridge. Since I made the paneer tikka for dinner, I marinated the paneer and veggies for 2 hours in the refrigerator. The longer it marinates, the better flavors get infused into the paneer and veggies.
- Vegetables: The veggies used can be of your choice. In the step by step photos, I have used onions and green bell pepper (capsicum). In the video I have used red, yellow and green bell pepper with onions. You can use baby corn, mushrooms, cauliflower, tomatoes, broccoli etc. For cauliflower blanch them before marinating.
- Adding Oil: While grilling or baking, the paneer cubes and veggies can become dry. Oil is added to paneer and veggie mixture to prevent this from happening. The paneer cubes and veggies are also brushed with some oil to avoid them from becoming dry.
- Overcooking: Don’t overcook the paneer as they then become rubbery, dry and hard. The paneer should be soft, well cooked but also succulent.
- Marinade: The leftover marinade can be applied or brushed on the paneer tikka before grilling them. If you are making paneer tikka masala gravy, you can use the extra marinade in the gravy.
- Vegan Options: Use tofu, seitan or tempeh in place of paneer. Use a vegan yogurt like almond or cashew yogurt in place of dairy yogurt.
More Tips to make Paneer Tikka on tawa or pan
- When you prepare paneer tikka on stovetop, either use a non stick or ceramic pan or use a well seasoned tawa or griddle. Even tawas on which you make dosas also work well.
- I have used both non stick and iron tawa and both work fine. For iron tawa or skillet, just remember that the tawa or skillet has to be seasoned very well. If you make roti or chapati on this tawa, then the paneer cubes will get stuck.
- For this paneer tikka recipe, I have used fresh homemade curd. The yogurt was thick enough and so I did not strain or hung it. Adding besan also helps in slight thickening of the marinade.
- If you use homemade or store brought yogurt, then ensure that the curd is thick. There should not be much whey in it. In case there is whey, then strain the yogurt in a cheesecloth for a few hours in the refrigerator, till you get thick yogurt.
How to season a skillet or tawa
- Basically, seasoning means to prepare the tawa or skillet for frying/roasting, wherein you heat the skillet and then apply oil. Let the oil get heated and then switch off the heat.
Wipe the oil with paper napkins or cotton napkin. Again apply oil and let the skillet or pan cool. Store the tawa/skillet with the oil on it.
You can repeat the first step twice or thrice. When you want to cook, heat the tawa and wipe off the oil. Then proceed with the recipe.
- I am also sharing reader Priya’s tip from the Pesarattu Dosa (Moong Dal Dosa) recipe post. She has been kind enough to give her grand mother’s tip on seasoning tawa while making dosa.
They have been using this technique for many years. This method is also helpful for folks who do not eat onions (to let you know, onions are used for seasoning tawa or pan wherein half of an onion is dipped in oil and then smeared on the tawa before making dosa).
The method follows: Heat the tawa or skillet. Add a teaspoon of sesame oil. Add ½ to 1 teaspoon of mustard seeds. Wait till the mustard starts spluttering. Spread the entire mixture of oil and mustard seeds with a spatula or spoon on the tawa and remove the oil and seeds. The tawa or skillet is ready to be used.
Some more tikka variations:
- Paneer Malai Tikka – Melt in the mouth tikka variant which is richer due to the inclusion of cream. This variant has more mild flavors than your regular paneer tikka.
- Achari Paneer Tikka – Robust, fragrant and delish version made with the typical Indian pickling spices.
- Hariyali Paneer Tikka – Adding fresh green herbs to the marinade makes this version green and so tasty.
More Paneer Snacks To Try!
Pakora Recipes
Paneer Pakora (Cottage Cheese Fritters)
Gluten Free Recipes
paneer 65

Paneer Recipes
Paneer Sandwich (2 ways)

Street Food Recipes
Paneer Roll Recipe | Paneer Kathi Roll | Paneer Wrap
Please be sure to rate this recipe in the recipe card below if you have made it. For more vegetarian inspirations, Sign Up for my emails or follow me on Instagram, Youtube, Facebook, Pinterest or Twitter.
Paneer Tikka Recipe (Restaurant Style)
This Restaurant Style Paneer Tikka is a popular and delicious tandoori snack where paneer (Indian cottage cheese cubes) are marinated in a spiced yogurt-based marinade, arranged on skewers and grilled in the oven.
Prep Time 15 mins
Cook Time 15 mins
Marinating Time 2 hrs
Total Time 2 hrs 30 mins
for paneer tikka marination
Prevent your screen from going dark while making the recipe
Making Marination
In a large bowl, take the hung curd (greek yogurt) and whisk it lightly till it becomes smooth
Add ginger-garlic paste, all the spice powders, carom seeds, black salt, regular salt, lemon juice and mustard oil.
Mix very well. Check the taste and add more seasonings if required.
Add the veggies and paneer to the marinade. Slowly and gently mix them with the marinade.
Cover the bowl and marinate for at least 2 hours or more in the refrigerator.
After 2 hours thread the paneer and veggies alternately on bamboo skewers. Soak or rinse the bamboo skewers before threading.
Grilling Paneer Tikka
Preheat the oven for 15 to 20 minutes at 230 or 240 degree celsius or 464 degrees Fahrenheit. Use only the top heating element.
Line a baking tray with aluminium foil or parchment paper. Arrange the paneer skewers on the tray. Brush some oil on the veggies and paneer cubes all over.
Place the tray on the top rack. Grill the paneer tikka first for 7 to 10 minutes at 230 or 240 degree celsius or or 464 degrees Fahrenheit. Then remove and turn the skewers.
Place back on the top rack in the oven and continue to grill for 3 to 5 minutes more till the edges of the paneer are golden or slightly charred. Do not grill for a long time as then paneer cubes becomes hard.
Since temperatures vary from oven to oven do keep a check. You can reduce or increase the time as required. Total grilling time will be 15 to 20 minutes.
Remove from the oven and then place the paneer cubes on a serving plate. Sprinkle some chaat masala and lemon juice.
Serve paneer tikka with mint chutney and onion rings with lemon wedges
- Barbecue: You can even use the barbecue grill for making the paneer tikka.
- Grilling in the oven: In the oven grill for 15 to 20 minutes at 230 or 240 degree celsius with only the top heating element on.
- Marination Time: I always suggest to to marinate the paneer cubes for 2 hours or more. You can also keep the marinated paneer overnight in the fridge. More marination, the better the flavors get infused in the paneer and veggies.
- Vegetables: Add a mix of veggies like bell pepper, onions, tomatoes, baby corn, mushrooms, cauliflower, tomatoes, broccoli etc. For cauliflower blanch them before marinating.
- Adding Oil: While grilling the paneer cubes and veggies can become dry. Hence oil is added to the marination mixture. The paneer cubes and veggies are also brushed with some oil to avoid them from becoming dry.
- Overcooking: Don’t overcook the paneer as they then become rubbery, dry and hard. The paneer should be soft, well cooked and yet succulent.
- Marinade: The extra marinade can be applied or brushed on the paneer tikka before grilling them. If you are making paneer tikka masala gravy, you can use the extra marinade in the gravy.
- Vegan Options: Use tofu, seitan or tempeh in place of paneer. Use a vegan yogurt like almond or cashew yogurt in place of dairy yogurt.
Nutrition Facts
Paneer Tikka Recipe (Restaurant Style)
Amount Per Serving
Calories 316 Calories from Fat 198
% Daily Value*
Fat 22g34%
Saturated Fat 11g69%
Trans Fat 1g
Cholesterol 47mg16%
Sodium 470mg20%
Potassium 193mg6%
Carbohydrates 11g4%
Fiber 2g8%
Sugar 4g4%
Protein 17g34%
Vitamin A 271IU5%
Vitamin B1 (Thiamine) 1mg67%
Vitamin B2 (Riboflavin) 1mg59%
Vitamin B3 (Niacin) 1mg5%
Vitamin B6 1mg50%
Vitamin B12 1µg17%
Vitamin C 19mg23%
Vitamin E 1mg7%
Vitamin K 3µg3%
Calcium 406mg41%
Vitamin B9 (Folate) 12µg3%
Iron 13mg72%
Magnesium 14mg4%
Phosphorus 102mg10%
Zinc 1mg7%
* Percent Daily Values are based on a 2000 calorie diet.
Paneer Tikka on Tawa
This stovetop Paneer tikka is spiced marinated cottage cheese cubes that are pan-fried on a tawa or skillet.
Prep Time 1 hr
Cook Time 20 mins
Total Time 1 hr 20 mins
Prevent your screen from going dark while making the recipe
Preparation
Slice the paneer into ¼ inch squares or cubes or rectangles.
Rinse the veggies. Halve the onion and remove each layer one by one.
Dice the capsicum/bell pepper into square shaped slices.
Dice the tomatoes too the same way. Remove the seeds from the tomatoes.
Keep the veggies and paneer aside.
Making marination
First whisk the thick yogurt (curd) till smooth in a bowl or pan.
Add all the spices and herbs, besan/gram flour and salt, except oil. Stir and mix well. Taste the marinade and add salt it required
Add the diced vegetables (onion, tomato and capsicum) along with paneer slices.
With your hands mix very well. So that the marinade coats the paneer and veggies evenly.
Cover the bowl & keep the marinade in the fridge for 45 minutes to 3 hours. You can also keep overnight.
Making paneer tikka on tawa
Heat 1 tbsp oil in a non stick pan/tawa or a well seasoned griddle. Coat the paneer and veggies with the marinade and place them on the tawa. You can fry them at a low flame or medium flame.
In all I fried in 3 batches and overall used about 3 tbsp oil. Another way is to skewer the paneer, veggies and then fry them. I chose to fry them directly as they get fried evenly and the texture is better.
When one side gets browned, gently lift and turn over. The paneer cubes will get cooked faster than the veggies.
- You can can char or brown the veggies more. But remember to remove the paneer cubes as soon as they are golden. If you want you can fry the paneer cubes first and then the vegetables. Remove them on a plate.
While still hot, then skewer the fried paneer cubes and veggies on to a wooden skewer or toothpick.
You can also have this paneer tikka straight away without skewering. Sprinkle some chaat masala & lemon juice.
Arrange them in a serving plate and serve the paneer tikka hot or warm with pickled vinegar onions (sirke wale pyaaz), or pyaaz lachcha (onion lemon salad) or mint yogurt chutney.
- Try to use a well seasoned tawa or skillet so that the tikka pieces do not stick on it.
- You can adjust the ground spices and seasonings as needed.
Nutrition Facts
Paneer Tikka on Tawa
Amount Per Serving
Calories 471 Calories from Fat 288
% Daily Value*
Fat 32g49%
Saturated Fat 14g88%
Trans Fat 0.003g
Polyunsaturated Fat 1g
Monounsaturated Fat 8g
Cholesterol 59mg20%
Sodium 667mg29%
Potassium 447mg13%
Carbohydrates 21g7%
Fiber 5g21%
Sugar 8g9%
Protein 24g48%
Vitamin A 771IU15%
Vitamin B1 (Thiamine) 0.1mg7%
Vitamin B2 (Riboflavin) 0.3mg18%
Vitamin B3 (Niacin) 1mg5%
Vitamin B6 0.3mg15%
Vitamin B12 1µg17%
Vitamin C 39mg47%
Vitamin E 5mg33%
Vitamin K 9µg9%
Calcium 529mg53%
Vitamin B9 (Folate) 66µg17%
Iron 2mg11%
Magnesium 43mg11%
Phosphorus 182mg18%
Zinc 1mg7%
* Percent Daily Values are based on a 2000 calorie diet.
This Paneer Tikka recipe post from the archives first published in October 2011 has been republished and updated on 23 June 2022.
[ad_2]
Source link